
Select one of the issues from the Issue summary screen and choose the icon to receive (but not barcode) the issue. The system displays the Receive issue form.
Numbering – enumeration and chronology of the issue. Not updateable.
Copies to receive – enter the number of copies of the issue that you are receiving for the current shelfmark.
Shelfmark sets – select which shelfmark sets you want to receive for. The list contains the shelfmark sets for the current shelfmark that have not received this specific issue (i.e. v.3). If a shelfmark set is controlled by a subscription, it does not get included in the list. A blank entry is also included in the list to allow you to receive the issue for a completely new shelfmark set.
For each shelfmark set in the list, the system displays a number (starting at 1 for unique identification purposes) followed by copy number (from the Shelfmark set general form) and binding status (i.e. no binding versus binding copy).
When you press the system verifies that the value in Copies to receive matches the number of shelfmark sets you selected. If no discrepancy is found, the system marks the issue as received on the selected shelfmark sets.
Once you have finished adding all information the system returns to the List of shelfmarks screen.

Type: the materials types of the items belonging to this shelfmark.
Shelfmark: the complete shelfmark of the items belonging to this shelfmark.
Sets: the number of sets linked to this shelfmark.
[I] - Select this option to add a new shelfmark. Please refer to section 111.6.1.1.
[*] - Select a shelfmark and then choose this option to update holdings information for this shelfmark. See section 111.6.1.2.
[S*] - Select a shelfmark and then choose this option to delete the shelfmark. This can only be done if there are no sets linked to the shelfmark.
[A*] - Select a shelfmark and then select this option to change the material type. Select the desired answer from the list.
Note
This changes the material type of ALL items linked to this shelfmark.
: to display items of another institution/location (the system can be configured in such a way that only the items of the current institution/location are shown initially).
: this option is only available in certain circumstances.
[W] - If you select this option, an input screen appears. In the input field From shelfmark enter the number of the line containing the shelfmark whose holdings data you wish to move. In the following input field To shelfmark, enter the number of the line containing the shelfmark to which you wish to move the holdings information.
Note
You will be moving ALL linked sets of that shelfmark to the new shelfmark. The shelfmark from which you moved the sets (to which now no sets are linked) is automatically deleted.
Select the icon from the Full record screen. The system displays the Item summary screen. Select one of the items and the system displays the Item detail entry screen. Select the Location field and the system responds by displaying the Location form.

Shelfmark set – displays a dropdown list of shelfmark sets at the current shelfmark that you can move this item to. If the item was received through Serials control, you will only see one shelfmark set in the list. For each shelfmark set in the list, the system displays a number (starting at 1 for unique identification purposes) followed by copy number (from the Shelfmark set general form), binding status (i.e. no binding versus binding copy) and receipt status (i.e. not received versus received). The system may also include one entry that is blank. Use this entry to start a new shelfmark set.
If you wish to move the item to another shelfmark on this title use either the (search shelfmark) or (add shelfmark) button depending on whether the shelfmark you are moving to already exists on the title. Regardless of which option you choose, the system redisplays the Location form with the newly selected shelfmark.

Now press to move the item to the new shelfmark.
The system behaves in the same way as with publication type 4.
When you choose type 3 it is not possible to use the option to add items. In that case the following message will be displayed:

You can however add a shelfmark in the usual way (see section 111.5.2). Next the system will not show the usual add item screen, but the holdings statement form. See section 111.6.1.1 for more information.
The system behaves in the same way as with publication type 3.
Publication type 6 records form part of analytical cataloguing. They are meant for component parts and therefor you cannot add items to type 6 records. It is possible to set up links between other record types, so you can add items to 'child' records.
See the general help on analytical cataloguing for more information including setup and examples.
Please note
This functionality is only available for Smart and UniMARC formats. It is not compatible with MARC21.
Records that have a link to one or more analytical entries, have an additional option on the overview screen, :

After selecting this option a new screen is displayed:
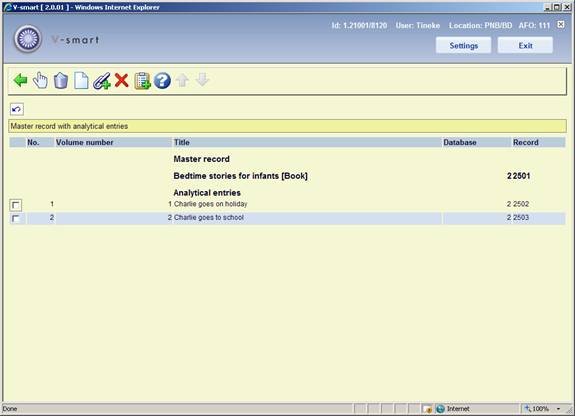
: Select a line and then this option to modify the entry. See the sections on adding and linking enties in the general help on analytical cataloging for more information.
: Select a line and then this option to delete the entry. The system prompts for confirmation.
: Use this option to create a new record to be linked to the master. See the general help on analytical cataloging for more information.
: Use this option to create a link with an existing record. See the general help on analytical cataloging for more information.
: This action will always delete the master record and it will delete the analytical entries as long as they don't have relations with other bibliographic records; a warning is displayed.
: Select one or more analytical entries and then this option to put them in a savelist.
Note
The option is only available for records that are created based on a template that has a link to another template for analytical cataloguing.
· Document control - Change History
|
Version |
Date |
Change description |
Author |
|
1.0 |
April 2008 |
creation |
|
|
2.0 |
August 2008 |
various updates; new option for serials holdings display; new option for WebOpac visibility |
|
|
2.1 |
January 2009 |
note for inventory number |
|
|
3.0 |
April 2009 |
new options: delete issue from summary screen, Moving shelfmarks to alternate bib, Changing holdings type, owner column in item display; updated info on: searching and on AFO 469 parameter; added type 6 records; improved info on item details, Z39.50 functions |
|
|
4.0 |
June 2010 |
New chapter on search result screen; improved bookmarks; new option to copy multiple records to another database; new automatic barcode feature; clear loan status button; possible to delete records with empty shelfmark; option to modify search term; more on restrictions, including new option; new option for related searches; new sort options, option to show title information in menu bar of record editor; option to browse through records; [ bracket for item barcode; author/title on item/shelfmark summary screens; simple template option |
|